
One of the biggest annoyances facing typical computer users today is spam. You know what that is, all that junk email you get every day that makes it difficult to get to the email you really want. Some people I know suffer through a hundred spam emails for every one they actually want, or more. The vast majority of these are trying to sell you something, the rest are trying to deceive you into letting them steal your money.
The irony here is that many people in the computer industry think the way to solve this problem is by using anti-spam software on your computer or anti-spam services that “clean” your email before you download it. Both of these can certainly work, and every solution has its pros and cons, but the really disgusting thing here is that these solutions require you to spend money to stop the spam.
I find that unacceptable.
So how can you stop the flood of spam without spending a dime? Google.
Google has one of the largest email services in the world, Gmail. They are also one of the biggest technology companies in the world. This means they can use their considerable tech know how to help keep spam out of their Gmail user’s inbox, and do a dang fine job of it.
So how can this help you if you don’t have or don’t want a Gmail email address? By using them as a free mail washing service for free. We are going to put the power of Gmail to use with any email address you may already have.
Lets start with an overview of what we will be doing. There are two ways to deal with email from an email program (whatever software on whatever device you use to read email, for example the email program built into IOS, Outlook or Thunderbird on the PC, or Amail on an Android device)l POP and IMAP.
POP (Post Office Protocol) communicates with your mail server and then downloads each email from the server to your device. Once the email has been downloaded it is typically deleted from the server and resides only on the device that downloaded it. Some software allows you to change a setting to leave the email on the server for a specific period of time which normally does not exceed thirty days. You can also configure things so that your emails are downloaded onto several devices instead of just one.
POP has the advantage of allowing you to retain years of emails in an offline program that can be searched very quickly. I personally have over fifteen years worth of email in my Outlook at home. This is so I can go back and look at where I purchased something years ago, find out who say what, etc.. One example is remembering where I purchased parts for devices that use consumables such as printers and the LED bulbs in my old DLP TVs.
The disadvantage of POP is that since the emails from more than thirty days are not on the server I have to have a device with me that has the emails I want on it. It also is not as convienient as you will soon find out.
IMAP (Internet Message Access Protocol) is a newer protocol with a few tricks up its sleeve. Unlike POP IMAP does not download mail to any device. When you open your email program it displays what is on the server. If you keep fifteen years of emails on the server, you can access them from anywhere.
Another interesting feature is that once a email is read on one device, it shows as read on all your devices. It also shows every email you have ever sent on every device. To put this another way, if you send an email on your phone and then open your email program on your PC that sent email is in your sent items box. If you use POP whatever email you sent on that device shows as sent on that device, but not on other devices.
One major disadvantage with IMAP is that if you are offline you see nothing so you can not find any information at all. Some software does allow you to keep some data offline but that is an exception and not a rule.
Once you know how you are going to be handling your emaill (either POP or IMAP) we need to figure out how to use Gmail to clean it. We will start with POP.
At this point I assume you have a POP email account already running. If you didn’t, how would you know you have too much spam? What we want to do is set up a Gmail account and have it fetch our email from our existing account, filter it, and then relay that clean spam free email back to us. First you will need a little information.
- Your email address
- Your email password (yes, you have one, every email account on the planet has one and always has had one. You may have only entered it one time years ago and so forgot that little tidbit but I assure you that you do indeed have one)
- Your email server’s incoming server address. This is typically something like pop.yourdomain.com or mail.yourdomain.com where yourdomain.com is the last part of your email address such as your.name@yourdomain.com. When it doubt contact your email provider and ask.
- Your email server’s port number (typically 110 for unencrypted connections or 995 for encrypted, again if unsure contact your email provider)
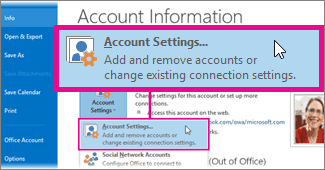
Much of this information can be found in your already working email program. For example, everything in the list above except the password is easily found in the settings for Outlook under account settings. These vary by version with older Outlook account settings being under Tools > Accounts while newer versions are under File > Account Settings > Account Settings.
Or in IOS 9 devices in the settings menu under “Mail, Contacts, Calendar” and then selecting the email account you want to work with:
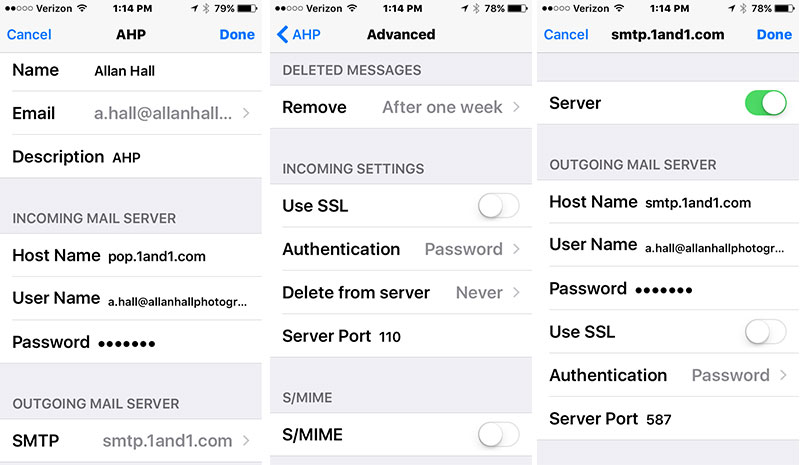
With that information we need to set up our Gmail account by going to www.gmail.com and following the directions. Remember that this email address will not be used for anything except for you to set up your filter. If you picked email.spam.filter.for.my.email@gmail.com no one would ever need to send an email to that address, not even you. You will see why shortly.
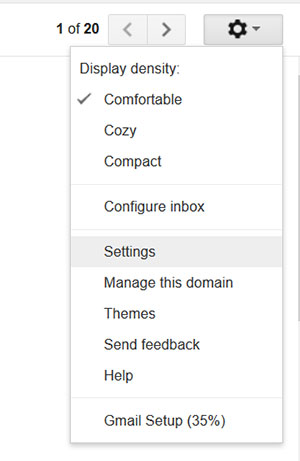
Once your shiny new email account is set up and running on Gmail we need to go into the settings for that account as shown here:
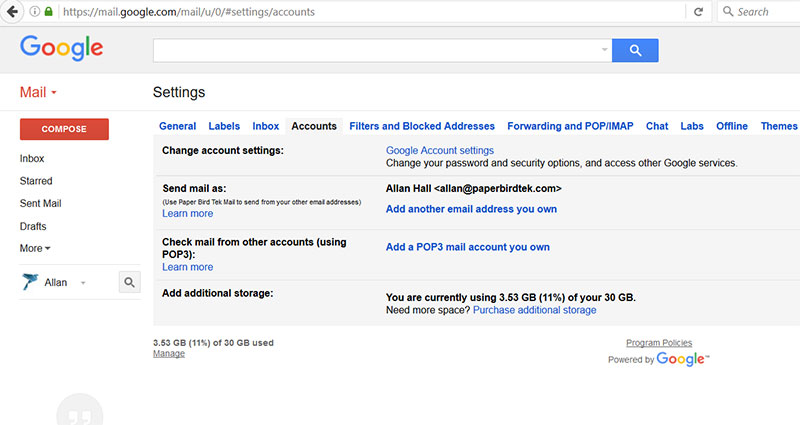
Now click on the “Add a POP3 mail account you own” link:
A pop up box will appear asking for the email address of the account you want to add and when you click “Next Step” you will see a new box asking for yiur username, password and the POP server address (this would be the “incoming” email address from Outlook or most other email applications). Once you click the “Add Account” button Gmail will attempt to go out and get mail from the POP account and start the filtering process.
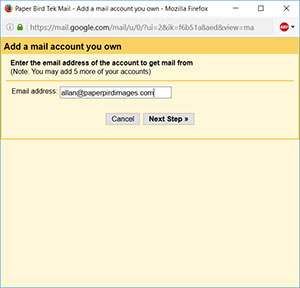
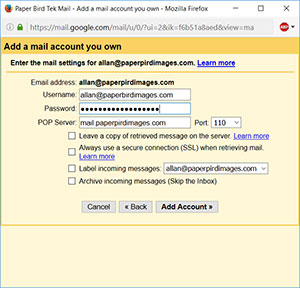
Now you need to go click on the “Forwarding and POP/IMAP” tab in your Gmail settings which will present you with this menu:
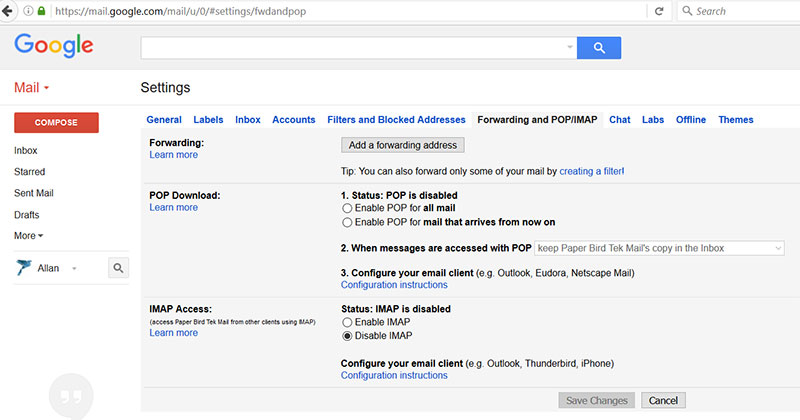
If you want to check your email using POP, you need to make sure that the “POP Download” status is enabled by selecting the “Enable POP for all mail” radio button. If you want to check your mail using IMAP be sure that the “IMAP Access” status is enabled by selecting the radio button next to “Enable IMAP”.
Near the bottom of either the POP or IMAP sections is a link “Configuration instructions” that will give you all the information you need to set up your email client to get email from Gmail.
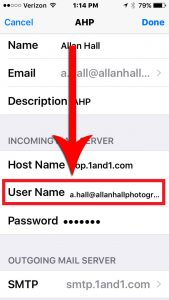
One important note is that if you plan on checking your email from multiple devices using POP then you may need to use Gmail’s “recent” mode. This is accomplished by changing your username for the POP server from “yourname@yourdomain.com” to “recent:yourname@yourdomain.com”. To hopefully make this a little less muddy look at the image to the left, where it says a.hall@allanhallphotogr…., that would need to be changed to “recent:a.hall@allanhallphotogr…” The same holds true in Outlook, Thunderbird, Aquamail or whatever mail program on whatever device you may be using.
The recent mode makes sure that the last 30 days of email is downloaded to the device regardless of what other devices have already downloaded the main, or what devices may have marked the mail as read. You should also make sure that every device is set to leave all mail on the server for some period of time, such as 30 days. This setting is mainly so that email is not removed from the server until that period of time expires. If you always and without exception check your email from every device within a week, then you could safely set that setting to seven days although there is rarely any benefit to setting the time shorter than 30 days.
So how well does this work? I had one customer who had their pretty effective server side anti-spam (a commercial product used by hundreds of web hosting companies all over the world) set to one notch more aggressive than default and still received well over a hundred spam emails a day. Since we switched to this system for a few weeks, not one single spam email has made it through and to their knowledge not one legitimate email has been misclassified as spam and deleted. Not bad eh?
All done! Now your email is being cleaned by one of the best anti-spam systems in the world, for free! Enjoy!
